FalconフレームワークをGAE(Google App Engine)で動かしたときのメモ。
Falconはミニマルで軽いWebフレームワークなので、GAEと相性がいいんじゃないかなーと思って動かして見ました。
ちなみに、書いてある手順はFalcon以外のWSGIアプリケーションでも同じように使えます。
環境
- macOS Sierra
- PyCharm Professional 2016.3.1
- Python2.7
- (ほぼ確実にないだろうけど、)GAEはSEもPython3対応してくんないかな...
- すでにgoogle_appengineのSDKはインストール済みであることを想定
- ソースコードはGitHubにおいています
PyCharmでGAEプロジェクトを作成
- プロジェクト用のディレクトリを作成する。
[alpaca]~ % mkdir gae-falcon
[alpaca]~ % cd gae-falcon
[alpaca]~ % virtualenv venv
[alpaca]~ % mkdir gae-falcon
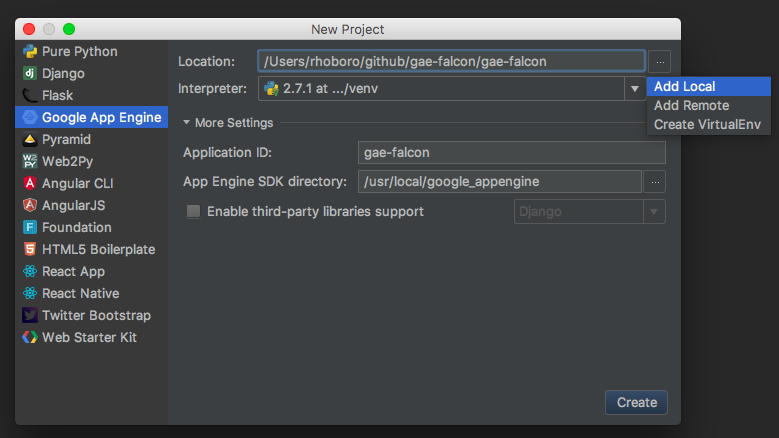
- PyCharmを起動して、File > New Projectを選択して、下記のように設定してCreate。
- Google App Engineを選択
- 空のgae-falconディレクトリを選択
- Add Localから先ほど作成した
venv/bin/python2.7を選択 - Application IDはGoogle App EngineのIDになるので世界で一意なものを指定
- 先にGoogle Cloud Platform上でプロジェクト作っておいたほうがいいかも
Falconのインストール
GAEでThird-party製ライブラリを使うには下記の2通りある。(公式ドキュメント)
- GAE側であらかじめ用意しているものを利用
- 自分で作るアプリケーションにライブラリのソースコードを入れる
今回利用するFalconはGAE側では用意されていないため、アプリケーション内にソースコードを配置します。
# app.yamlのある場所で
[alpaca]~ % mkdir lib
[alpaca]~ % pip install -t lib falcon
[alpaca]~ % cat << EOF > appengine_config.py
heredoc> from google.appengine.ext import vendor
heredoc> vendor.add('lib')
heredoc> EOF
-
PyCharmでlibディレクトリを補完対象にする
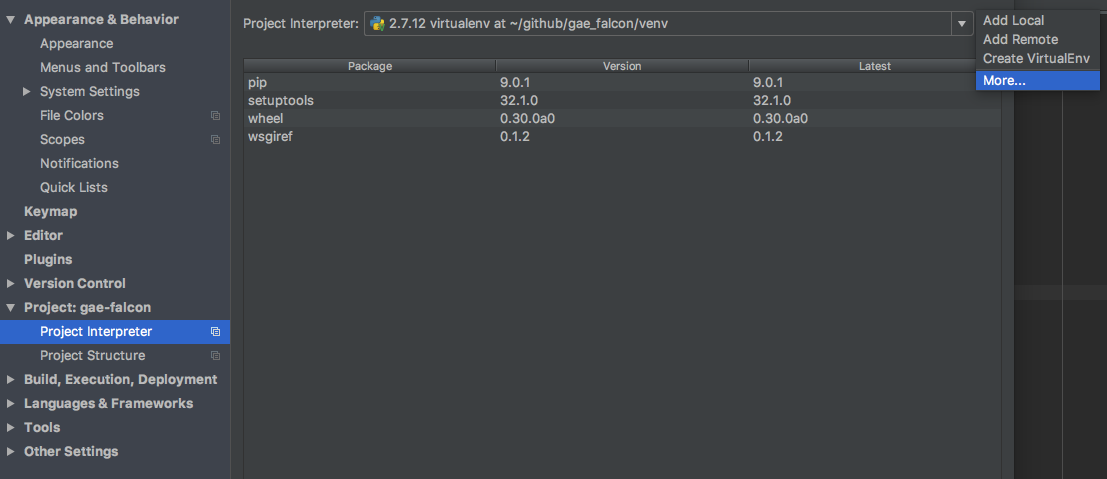
- PyCharm > Preferences... を開き、Project: XXX > Project Interpreterを選択
- 歯車マークからMoreを選択
- ウィンドウ下にあるボタンのうち、一番右を選択
- 表示されたウィンドウの左下の+マークからFalconをインストールしたlibディレクリを選択
-
main.pyを下記の内容に編集(公式ドキュメントのQuickstartより)
# things.py

# Let's get this party started!
import falcon


# Falcon follows the REST architectural style, meaning (among
# other things) that you think in terms of resources and state
# transitions, which map to HTTP verbs.
class ThingsResource(object):
    def on_get(self, req, resp):
        """Handles GET requests"""
        resp.status = falcon.HTTP_200  # This is the default status
        resp.body = ('\nTwo things awe me most, the starry sky '
                     'above me and the moral law within me.\n'
                     '\n'
                     '    ~ Immanuel Kant\n\n')

# falcon.API instances are callable WSGI apps
app = falcon.API()

# Resources are represented by long-lived class instances
things = ThingsResource()

# things will handle all requests to the '/things' URL path
app.add_route('/things', things)
PyCharmでRunボタンからアプリケーションを実行して、localhost:8080/thingsにアクセスして下記が表示されたらOK。
Two things awe me most, the starry sky above me and the moral law within me.

    ~ Immanuel Kant
ちなみにこれで動くのは、app.yamlで下記のような指定がされているからです。
ここで指定してあるmain.appがmainスクリプト内のapp変数がWSGIアプリケーションという宣言なので、Falcon以外のPython製Webフレームワークでも全く同じように利用できます。
- url: .*
  script: main.app
デプロイ
- ブラウザでGoogle Cloud Platformを開く
- プロジェクトを新規作成する。プロジェクト名はPyCharmでプロジェクト作成時に指定したものと同じにする。
- 新規作成したプロジェクトのダッシュボードからGoogle App Engineを有効化
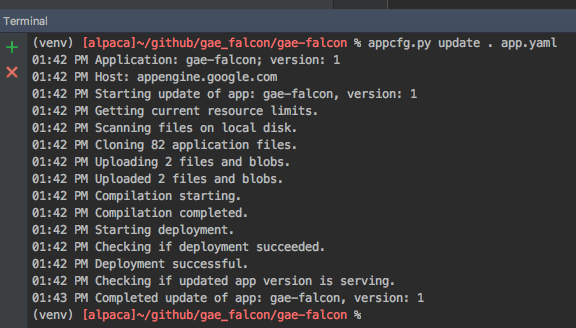
- PyCharmでTerminalを開いて
appcfg.py update . app.yamlを実行 - 下記のようになればデプロイ成功
最後にhttps://[プロジェクト名].appspot.com/thingsにアクセスして、先ほどローカルで表示されたものと同じ内容が表示されたら完了です。
ちなみに、GAE関係なく、自分で書いたスクリプトでlibディレクトリからimportしたいときは、こちらを参考に下記のようにします。
import sys
sys.path.insert(0, 'libs')
from falcon import falcon